

DIY Christmas Ornament Crafts to Personalize Your Home Decor

Christmas is the time of merriment, festivities, gift-giving, and, above all, spiritual reflection. And before the actual arrival of Christmas day, comes a lot of preparation and prearranging to ensure a splendid celebration. In fact, as early as September, we begin putting up our Christmas trees and hanging other ornaments to give a warm welcome to the holidays. However, with all the hustle and bustle, not always do we enjoy the preparation period, as it tends to be more stressful.
Let me tell you a little secret! Do you know you can have more fun decorating the house with your loved ones by making your own ornaments with them? It’s fun, easy, and brings your family closer together. So, while we’re still a few months away from Christmas eve, let us give you a few Christmas ornament hacks to make the celebration extra special.
Listed below are four Christmas ornament crafts to help you personalize your home decor:
DIY Mason Jar Snow Globe
Perhaps you have empty or unused jars and old figurine toys your children might not play with anymore. If so, then, right off the bat, you have the basic materials needed for a homemade snow globe. But to make it extra special, and fit for the Christmas season, here are the specifics of what you will be needing.
Materials Needed:
- An empty and clean jar
- Distilled Water
- Glycerine
- Figurine Toys
- Super Glue or Glue Gun
- Glitter and Sequins


The Process: Just glue the figurines onto the inside of the jar’s lid with a glue gun or super glue, and wait until it dries. Then, add distilled water and glycerine to the container then mix them. To add some sparkle, add enough glitter and sequins into the liquid mixture, then mix them once more. Finally, fasten the lid onto the jar, then voila! You now have your homemade snow globe!
Christmas Pompom Balls
What’s a more easily-accessible material, especially when you have schooling kids at home than a ball of yarn? And depending on what design you’re interested in doing, you may also need a few add-on materials. These materials may include, bottle caps, jingle bells, beads, and many more. But for its simplest version, we’re just gonna need one material.
Material Needed:
- Yarn


The Process: To create these fuzzy pompom balls, cut an 8-inch long piece of yarn to set aside for later use. After that, drape the yarn over your fingers or a fork. Once thick enough, cut it and carefully remove the ball of yarn from your fingers or your fork. Then, take the 8-inch long yarn you set aside a while ago and tie it around the middle part of the ball of yarn you made earlier. Once done, cut the loops on both sides of the ball of yarn, then fluff it up! Now you have a pompom ball! For further reference, you may check out the video below.
Pine Cone Ornaments
Maybe you have dusty old pine cone ornaments you want to repurpose for the upcoming holidays! If so, then you might want to turn it into hanging ornaments or mini Christmas trees like the ones shown below. Don’t worry, because as simple as it looks, the process is just as easy to follow.
Materials Needed:

- Pine cone decorations
- Colorful beads
- Bottle caps
- Yarn or anything you can use as a noose
- Glue Gun
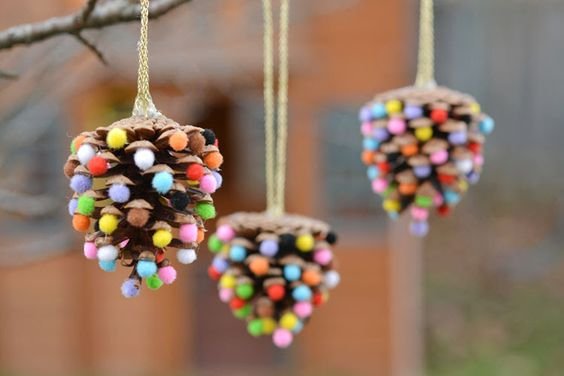

The Process: For both ornaments, you will just have to glue the beads onto the cones to add bling to your plain pine cone. Once done, you may either glue the cone to a bottle cap or a noose to make a mini Christmas tree or a hanging ornament. After that, your repurposed pine cones are good to go!
Ribbon Tree
As for our last Christmas ornament, we will be doing a household decor that is a classic Christmas staple. That will be no other than, the classic Christmas tree. However, in this version, we will be using ribbons instead of synthetic leaves.
Materials Needed:
- Any thick paper material for the tree’s base
- Ribbon
- Glue Gun
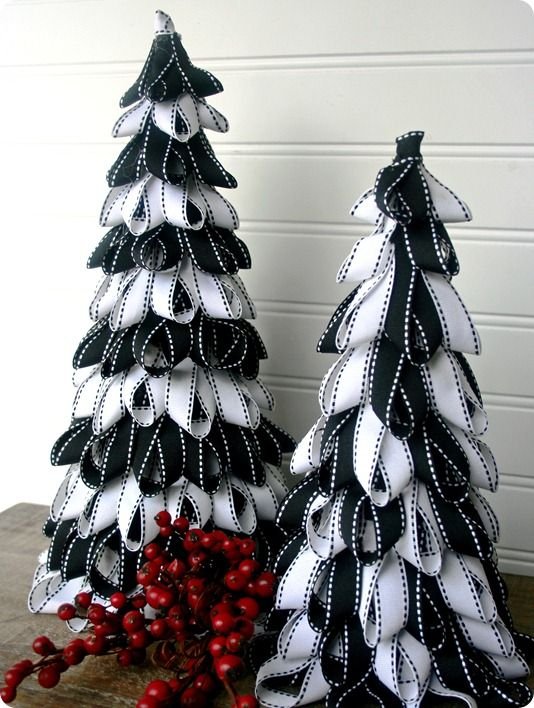


The Process: For the Ribbon Tree’s base, you may roll your chosen paper material into a cone shape. You may adjust the cone’s size depending on your preference. Once done, glue the edges together to secure the cone, and to make the cone stand, cut its base until flattened. As for the ribbons, you may snip them according to your preferred length, and once done, glue them onto the cone base until fully covered. After all that, you now have a ribbon Christmas tree! Piece of cake, right?

